Project Overview项目简介
Complete reference for hardware, firmware, and web tools. Whether you're running XTIA firmware out of the box, switching to GP2040-CE, or writing your own code from scratch — this is your starting point. 涵盖硬件、固件与网页工具的完整参考文档。无论是使用开箱即用的 XTIA 固件、切换到 GP2040-CE,还是从头编写自己的代码,这里都是你的起点。
If you only use the official XPAD firmware, see the Quick Start in the User Guide — this document is geared more toward understanding the hardware and learning to develop with it. 如果你仅使用 XPAD 官方固件,请参考使用说明页面中的快速入门。该文档更多用于硬件了解和学习使用。
It covers the material needed for secondary development, including hardware reference, firmware notes, pin mappings, and web-tool behavior. 该文档覆盖二次开发所需资料,包括硬件参考、固件说明、针脚映射和网页工具行为。
Beyond the firmware, Small Deck combines an optional desktop launcher app with an XPAD mapping preset for F13–F24. The app can launch a program, file, folder or website from those triggers; XPAD provides a convenient layout for sending them, but the keyboard works fully without the app and third-party launchers can use the same keys. See the Small Deck section below for details. 在固件之外,Small Deck 由可选的电脑端启动器软件,以及 XPAD 上用于输出 F13–F24 的映射预设组成。软件可以用这些触发键启动程序、文件、文件夹或网址;XPAD 提供方便发送这些按键的布局,但不安装该软件也不影响键盘正常使用,第三方启动器也可以使用同样的按键。详情见下方 Small Deck 章节。
Design Highlights 设计亮点
XPAD is an open-source macro pad built around 3D printing and a modular, solder-free design. Here are the core design ideas behind it. XPAD 是一套围绕 3D 打印与模块化免焊接设计打造的开源宏键盘。以下是它的几个核心设计要点。
1 · Fully 3D-print-oriented automated shell generation1 · 完全为 3D 打印设计的自动化外壳生成
The shell generation system and its module-splitting logic are designed entirely for 3D printing — it automatically turns your chosen layout into print-ready shells and parts, with no CAD work required. 外壳生成系统与模块拆分逻辑完全为 3D 打印而设计——根据你选择的配列自动生成可直接打印的外壳与分件,无需任何建模工作。
2 · Modular, solder-free, screw-free hardware2 · 模块化、免焊接、无螺丝安装的硬件
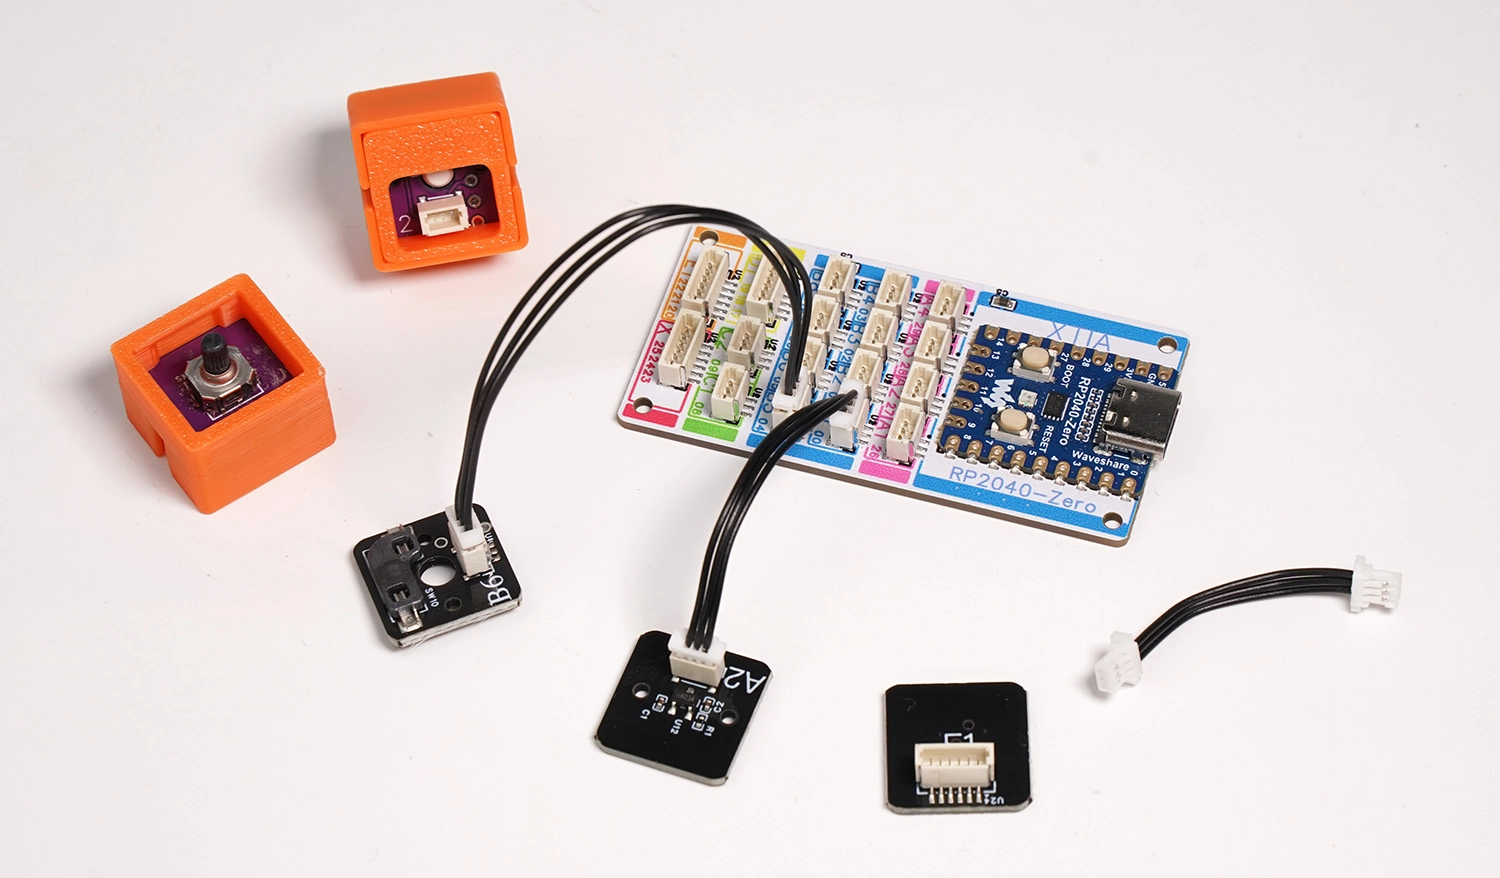
The hardware is modular, solder-free, and designed for screw-free assembly, making full use of the MCU's resources while keeping the build approachable. It supports a range of module types: hall-effect switches (×4), mechanical switches, a microphone, a rotary encoder, and more. (DRV8833 vibration-motor support and pin breakout are already done, but the vibration motor module itself is not offered yet — whether to release it is still to be decided.) 硬件采用模块化、免焊接和无螺丝安装设计,在充分应用主控硬件资源的同时,尽量降低组装门槛。当前提供多种模块类型:磁轴(4 个)、机械轴、麦克风、旋钮等。(DRV8833 震动马达的适配与针脚引出均已完成,但震动马达模块尚未提供,后续是否提供待定。)
3 · Not locked to the official hardware3 · 不绑定官方硬件
If you'd rather not use the official XPAD hardware, you can build your own with a third-party RP2040 board, mechanical switches, and some soldering. We charge only a small authorization fee for the shell generation feature — every other tool and all firmware are provided free. 如果不使用 XPAD 官方硬件,你也可以用第三方 RP2040 开发板 + 机械轴 + 焊接的形式自行组装。我们仅对外壳生成功能收取少量授权费用,其余所有功能和固件均免费提供。
4 · Headroom reserved for development4 · 为开发预留接口
The controller module reserves spare I2C / SPI interfaces, and the switch modules include reserved power and PIO solder points — giving builders plenty of room for their own development. 控制板模块预留了额外的 I2C / SPI 接口,轴体模块上也预留了供电与 PIO 焊接点,充分为买家的开发提供便利。
5 · Fully open Arduino firmware for learning5 · 面向学习的全开源 Arduino 固件
We also provide fully open-source firmware on the more approachable Arduino framework. We hope XPAD can attract the small crowd of geeks who are curious about embedded development but don't have a place to start — and become their starting point. 我们还提供了基于更简单的 Arduino 架构的全开源固件。我们希望 XPAD 能够吸引一小批对嵌入式开发有兴趣、但没有着手点的极客,作为学习的原点。
What's in the Box 开箱清单
Your XPAD kit ships with everything needed for immediate use. The following list covers a standard kit — add-on modules (voice, encoder) are sold separately; the vibration module is still in development and whether it will be offered is to be decided. XPAD 套件包含即插即用所需的一切。以下清单为标准套件内容,附加模块(语音、旋钮编码器)单独销售;震动模块仍在开发中,是否发售待定。
- Controller (MCU core)主控(核心板)
- Key modules按键模块
- Switches轴体 — 8 mechanical (MX) + 4 hall-effect (magnetic) —— 机械轴 8 个 + 磁轴 4 个
- Connection cables in assorted lengths不同长度的连接线
Official Presets官方预设
The homepage presets are six reference layouts built on XPAD's modular hardware. They are not separate products; each preset is a recommended module combination plus a matching layout in the Layout Generator. This section summarizes the use case, hardware, and firmware requirements for each preset. 首页官方预设展示了基于 XPAD 模块化硬件搭建的 6 种参考配列。它们不是独立产品,而是「推荐模块组合 + 配列生成器中的对应配列」。本节说明每种预设的用途、硬件组成和固件要求。
1 · Small Deck control terminal1 · Small Deck 控制终端
Provides an XPAD mapping for launcher-style control. It can work with the optional Small Deck desktop app or third-party automation tools to launch apps, files, folders and websites from one key. The same preset can also be used as a trigger surface for macro commands or script actions. 面向桌面启动器和宏控制场景。它可以配合可选的 Small Deck 电脑端软件,也可以配合第三方自动化工具,一键启动应用、文件、文件夹和网页;同一套按键也可作为宏指令或脚本指令的触发入口。
Small Deck is one of the more important and more complex XPAD workflows. For the full structure, app behavior, and keycap notes, see the Small Deck section in this document. Small Deck 是 XPAD 中相对重要、也相对复杂的一组功能。关于它的组成、软件行为和键帽适配,请查看本文档中的 Small Deck 章节。
2 · Hall-effect rhythm pad2 · 磁轴音游键盘
Uses up to four independent hall-effect switch inputs. Each switch can be calibrated separately for precise actuation control, and the preset supports Rapid Trigger for rhythm-game style repeated input. Use the ADC calibration tool after assembly for best consistency. 最多使用 4 个独立磁轴输入。每个轴体都可以单独校准,实现更精确的触发控制,并支持适合音游连续输入的 Rapid Trigger 功能。组装后建议使用磁轴校准工具完成逐轴校准。
3 · Office numpad3 · 办公数字键盘
Uses all available switch modules to create a compact numeric keypad for frequent number entry. It is intended for spreadsheets, accounting tools, data entry and other workflows where a small dedicated numpad is more efficient than the main keyboard row. 使用全部轴体模块组成紧凑数字键盘,面向表格、财务、数据录入等高频数字输入场景。相比主键盘数字行,独立数字区更适合长期、重复输入。
4 · Software shortcut hub4 · 软件快捷中心
Maps keys to shortcuts and macros for professional software. It can be adapted to editing, CAD, coding, streaming or other tool-heavy workflows where repeated commands benefit from a dedicated control surface. 通过快捷键和宏配置,实现专业软件的快捷控制。它可以按需要适配剪辑、CAD、编程、直播控制等高频工具流,把重复命令集中到独立控制面板上。
5 · AI assistant pad5 · AI 助手键盘
Uses the onboard microphone for close-range PC voice input, with hotkeys for common prompts, voice workflows, and macros. The layout is open and customizable, so it can be adapted to different AI assistant or desktop automation habits. 板载麦克风用作电脑近端语音输入,快捷键可触发常用提示词、语音工作流和宏。该布局开放可自定义,可按不同 AI 助手或桌面自动化习惯调整。
6 · Linear racing keyboard6 · 全线性赛车键盘
Uses the XPAD branch of GP2040-CE firmware to expose four hall-effect switches as full linear inputs. It is optimized for racing games and supports the XInput protocol. Haptic module support is still in development. 使用 GP2040-CE 的 XPAD 分支固件,将 4 个磁轴作为全线性输入输出。该预设专为赛车游戏优化,支持 XInput 协议;震动模块仍在开发中。
Assembly and Printing Guide装配及打印教程
1 · Assembly Guide1 · 装配教程
Content coming soon. 内容即将补充。
2 · Printing Guide2 · 打印教程
- Material, printer, and filament-flow differences all affect assembly fit. You may need to try one or two tolerance versions before choosing the best file for your printer. In our tests, Bambu Lab printers using default settings with regular PLA (non-matte) produced the smoothest assembly and most consistent dimensional accuracy. Matte PLA and PETG usually fit slightly tighter or less consistently.不同打印材料、打印机和耗材流量都会影响装配松紧度。你可能需要尝试 1–2 次不同装配精度的文件,再选择最适合自己设备的版本。根据我们的经验,拓竹打印机在默认打印参数下使用常规 PLA(非磨砂)时,装配流畅度和尺寸精度最好;磨砂 PLA 和 PETG 的契合度通常会略差一些。
- For larger prints, such as the Gamepad preset, apply glue to the build plate before printing to reduce edge lifting and warping.较大尺寸的打印件,例如 Gamepad 预设,建议在打印前提前在打印底板涂抹胶水,以降低翘边和变形风险。
- A separate illustrated guide for multi-color keycap printing will be added later.键帽多色打印的图文教程会在后续单独补充。
Hardware Reference硬件参考
MCU: Waveshare RP2040 Zero 主控:Waveshare RP2040 Zero
XPAD is built around the Waveshare RP2040 Zero — a compact, castellated-edge development board based on the Raspberry Pi RP2040 chip. See the official Waveshare wiki for full board documentation. XPAD 以 Waveshare RP2040 Zero 为核心——一款基于 Raspberry Pi RP2040 芯片的紧凑型开发板,具有邮票孔焊盘设计。完整的开发板资料请参阅 微雪官方 wiki。
XPAD extends this MCU with a socketed interface, eliminating the need for soldering. Each socket uses a letter (module type) + number labeling scheme, which simplifies assembly and maps cleanly to the Layout Generator. XPAD 将该主控进行了插口化拓展,避免了焊接需求,并采用字母(代表模块类型)+ 数字的编号方式,便于组装,并与配列生成器建立映射对应关系。
Pinout Overview 引脚总览
The table below shows how GPIO pins on the Waveshare RP2040 Zero are wired to XPAD components. This is the XPAD-specific wiring — it does not reflect the default GP2040-CE layout. We provide this mapping so customers can take advantage of the board's fully socketed, solder-free design to develop more advanced features. 下表展示了 Waveshare RP2040 Zero 的 GPIO 引脚与 XPAD 各组件的对应关系。这是 XPAD 专属接线方式,不等于 GP2040-CE 的默认引脚分配,我们提供对应关系,方便客户利用该开发板全插口免焊接的便利进行更复杂功能的开发。
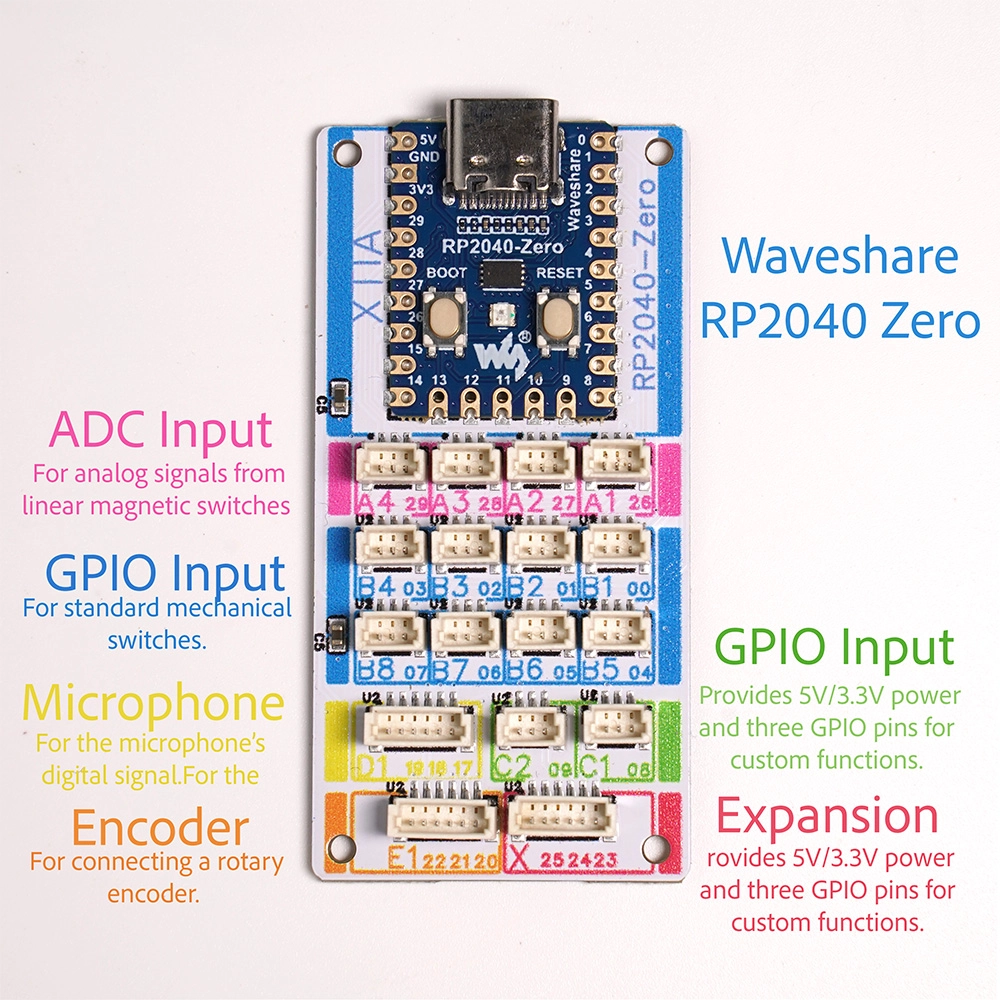
| GPIO | XPAD Mainboard SocketXPAD 主控插口 | Function功能 | Module Type模块类型 | Notes备注 |
|---|---|---|---|---|
| GP0 | b1 | MX keyMX 按键 | MX | |
| GP1 | b2 | MX keyMX 按键 | MX | |
| GP2 | b3 | MX keyMX 按键 | MX | |
| GP3 | b4 | MX keyMX 按键 | MX | |
| GP4 | b5 | MX keyMX 按键 | MX | |
| GP5 | b6 | MX keyMX 按键 | MX | |
| GP6 | b7 | MX keyMX 按键 | MX | |
| GP7 | b8 | MX keyMX 按键 | MX | |
| GP8 | c1 | Heavy rumble motor PWM重振动马达 PWM | VIB | Switchable to a regular MX slot (see C1/C2 extension); left rumble motor under GP2040-CE可切换为常规机械轴接口(见 C1/C2 拓展);GP2040-CE 下为左马达 |
| GP9 | c2 | Light rumble motor PWM轻振动马达 PWM | VIB | Switchable to a regular MX slot (see C1/C2 extension); right rumble motor under GP2040-CE可切换为常规机械轴接口(见 C1/C2 拓展);GP2040-CE 下为右马达 |
| GP16 | — | Onboard WS2812 RGB LED板载 WS2812 RGB LED | LED | On the RP2040 Zero board itself, not an XPAD socket位于 RP2040 Zero 板上,非 XPAD 插口 |
| GP17 | D1 | I2S SCK (microphone)I2S SCK(麦克风) | VOICE | Unused under GP2040-CE (no I2S support)GP2040-CE 下不可用(无 I2S 支持) |
| GP18 | D1 | I2S WS (microphone)I2S WS(麦克风) | VOICE | Unused under GP2040-CEGP2040-CE 下不可用 |
| GP19 | D1 | I2S SD (microphone)I2S SD(麦克风) | VOICE | Unused under GP2040-CEGP2040-CE 下不可用 |
| GP20 | E1 | Encoder SW (push)编码器 SW(按压) | ENC | → A1 (Home / Xbox Guide) under GP2040-CEGP2040-CE 下映射为 A1(Home 键) |
| GP21 | E1 | Encoder A phase编码器 A 相 | ENC | RotaryEncoder Addon PIN_ARotaryEncoder Addon PIN_A |
| GP22 | E1 | Encoder B phase编码器 B 相 | ENC | RotaryEncoder Addon PIN_BRotaryEncoder Addon PIN_B |
| GP26 | a1 | ADC0 — Hall axisADC0 — 霍尔轴 | ADC | → LX(−) under GP2040-CEGP2040-CE 下为 LX(−) |
| GP27 | a2 | ADC1 — Hall axisADC1 — 霍尔轴 | ADC | → LX(+) under GP2040-CEGP2040-CE 下为 LX(+) |
| GP28 | a3 | ADC2 — Hall axisADC2 — 霍尔轴 | ADC | → RT under GP2040-CEGP2040-CE 下为 RT |
| GP29 | a4 | ADC3 — Hall axisADC3 — 霍尔轴 | ADC | → LT under GP2040-CEGP2040-CE 下为 LT |
| GND | GND | Ground接地 | GND | |
| 3V3 | 3V3 | 3.3 V Power3.3 V 电源 | PWR |
GP10–GP15 are not used by any XPAD module; they remain available for secondary development via the board's reserved breakout (see Alternative Development). GP10–GP15 未被任何 XPAD 模块使用,可通过主板预留引出用于二次开发(见备用开发功能)。
net = a2_activation − a1_activation, mapped to ±32767. Center (0) when both axes are at rest.
GP2040-CE 通过差分逻辑将两路转向霍尔轴(a1 / a2)合并为单一 LX 轴:net = a2_activation − a1_activation,映射至 ±32767。两轴均未按下时居中(0)。
Key Module Types 按键模块类型
XPAD supports multiple key module types, each occupying a dedicated GPIO slot in the matrix. The Layout Generator uses these types to configure both physical shell generation and firmware behavior. XPAD 支持多种按键模块类型,每种类型在矩阵中占用专属的 GPIO 插槽。配列生成器通过这些类型同时配置外壳生成方案和固件行为。
| Type类型 | Switch Mechanism开关机制 | Analog模拟量 | Notes备注 |
|---|---|---|---|
| MX | MX-compatible mechanical switchMX 兼容机械轴 | No否 | Digital on/off, GPIO pull-up数字开关,GPIO 上拉 |
| Hall磁轴 | Hall-effect magnetic switch磁轴(线性磁感应) | Yes — 12-bit是 — 12 位 | Rapid Trigger supported; magnetic switch calibration recommended支持 Rapid Trigger;建议进行磁轴校准 |
| ENC | Rotary encoder旋钮编码器 | Incremental增量式 | A/B phase + push-button on 3 GPIO pinsA/B 相 + 按压,共 3 个 GPIO |
| Audio音频模块 | I2S microphone moduleI2S 麦克风模块 | Input only仅输入 | USB audio input under XTIA firmwareXTIA 固件下作为 USB 音频输入 |
C1 / C2 — Vibration Sockets as Regular MX Slots C1 / C2 — 震动接口用作常规机械轴
The C1 and C2 sockets are reserved for the vibration motor module, which is still in development (whether it will be offered separately is still to be decided). Each socket carries one signal line plus GND — electrically the same as what an MX switch needs — so we provide the option to use C1/C2 as regular MX sockets.
C1、C2 接口为震动马达模块预留,该模块仍在开发中(是否单独发售待定)。每个接口由 1 根信号线 + GND 组成,与 MX 轴所需的电气结构完全一致,因此我们提供了将 C1/C2 用作常规机械轴接口的选项。
-
1Enable the extension开启拓展 In the Layout Generator, open Advanced Settings and turn on C1 C2 Extension — Regular MX Switches.在配列生成器的进阶设置中,开启「C1 C2 拓展 — 常规机械轴体功能」。
-
2Place and map like B1–B8像 B1–B8 一样放置和映射 C1/C2 become placeable on the canvas and behave exactly like the MX slots B1–B8: assign a position, map a key, combo or macro, and verify it in key test mode.开启后 C1/C2 即可放入画布,行为与 B1–B8 的机械轴完全一致:放置位置、映射按键/组合键/宏,并可在按键测试模式中验证。
-
3Plug in MX modules and write the layout插入 MX 轴模块并写入配列 Plug standard MX key modules into the C1/C2 sockets, then click Write Layout as usual.将标准 MX 轴模块插入 C1/C2 接口,然后照常点击写入配列即可。
Alternative Development 备用开发功能
XPAD uses a Waveshare RP2040 Zero development board, so it can support more potential development work beyond keyboard-only use cases. All GPIO pins available on the RP2040 Zero are exposed through XPAD's socketed mainboard, allowing users to take advantage of the solder-free interface and try more creative designs. XPAD 采用 Waveshare RP2040 Zero 开发板,这意味着它也可以满足更多潜在的非键盘开发需求。所有 RP2040 Zero 可用的 GPIO 都通过 XPAD 主板插口进行了引出,用户可以利用主板插口的免焊接优势,尝试更有创意的设计。
The modules and core board include several reserved interfaces for secondary development and future expansion: 同时,我们在模块与核心板中预留了以下潜在用途,方便二次开发和后续扩展:
-
1Reserved 6P expansion connector预留 6P 扩展接口 Connector
Xexposes3.3V,5V,GNDand GPIO lines, allowing external high-bandwidth devices to be connected where appropriate.接口标号为X,包含3.3V、5V、GND和 GPIO 接口,可用于外接高带宽设备。 -
2Back-side solder pads on modules模块背面焊接接口 The back side of the module interface includes solder pads for potential add-ons such as external displays or LED matrices.模块背面预留焊接接口,可用于潜在的外接屏幕或 LED 矩阵。
-
3Power and GPIO pads on MX modulesMX 轴模块供电与信号预留 Although MX switch modules do not require power for normal key input, each module still provides
5V,GNDand the corresponding GPIO solder pads, so the same module position can be reused for customer-side development.MX 轴模块本身不需要供电,但我们仍为模块提供了5V供电和焊接针脚,包含5V、GND与对应 GPIO,方便客户使用 MX 轴模块做二次开发。
UF2 Flash Method UF2 刷写方法
All three supported firmware options use the standard RP2040 UF2 drag-and-drop flash method. No external programmer is required. 三种固件均使用标准 RP2040 UF2 拖拽刷写方式,无需外部烧录器。
-
1Enter BOOTSEL mode进入 BOOTSEL 模式 Hold the
BOOTbutton on the Waveshare RP2040 Zero, then plug in the USB-C cable. Release the button after connecting.按住 Waveshare RP2040 Zero 上的BOOT按钮,插入 USB-C 数据线后松手。 -
2Open the RPI-RP2 drive打开 RPI-RP2 磁盘 A removable drive named
RPI-RP2will appear in your file manager (Windows Explorer / macOS Finder).文件管理器(资源管理器 / Finder)中会出现名为RPI-RP2的可移动磁盘。 -
3Drag the .uf2 file onto the drive将 .uf2 文件拖入磁盘 Drag your chosen
.uf2firmware file directly onto theRPI-RP2drive. The drive will disconnect automatically when flashing is complete.将所选.uf2固件文件直接拖入RPI-RP2磁盘。刷写完成后磁盘会自动断开。 -
4Reconnect normally正常重新连接 Unplug and reconnect the USB cable (no buttons held). The keyboard will boot into the newly flashed firmware.拔掉数据线后正常重新插入(不按按钮),键盘将以新固件启动。
Web Tools网页工具
Web Tools — Layout Generator 网页工具 — 配列生成器
The Layout Generator lets you define your XPAD key matrix — how many rows and columns, which module type each slot uses, and what function each key performs. It generates both the printable STL files and the firmware keymap in one step. 配列生成器 让你定义 XPAD 按键矩阵——包括行列数量、每个插槽使用的模块类型,以及每个按键的功能。它可以一步生成可打印的 STL 文件和固件键位映射。
Web Tools — Hall-Effect Calibration 网页工具 — 磁轴校准
The Hall-Effect Calibration page connects to your XPAD via WebUSB and provides real-time ADC value visualization, per-axis threshold configuration, and Rapid Trigger sensitivity tuning. Only available with XTIA firmware. 磁轴校准 页面通过 WebUSB 连接 XPAD,提供实时 ADC 值可视化、逐轴阈值配置和 Rapid Trigger 灵敏度调节。仅在 XTIA 固件下可用。
Web Tools — Keycap Generator 网页工具 — 键帽生成器
The Keycap Generator creates custom STL keycaps for 3D printing. It works independently of any firmware or connected device, and can generate text keycaps, basic shape variants, and icon keycaps for Small Deck. 键帽生成器 可生成用于 3D 打印的自定义 STL 键帽。此工具独立运行,无需任何固件或连接设备,并支持文字键帽、基础形状变化和 Small Deck 图形键帽。
- XPAD's module structure leaves room for oversized keycaps, so you can cover larger areas and create more specific control surfaces than a standard key grid normally allows.得益于 XPAD 的特殊模块结构,你可以生成超尺寸键帽,覆盖更大的按键区域,做出普通键盘矩阵较难实现的控制效果。
- Keycap shape can be adjusted per key or globally. The current generator provides rounded rectangle by default, plus hexagon and circle options.键帽形状可单独修改,也可以全局修改。当前暂时提供默认圆角矩形,以及六边形、圆形两种形状。
- Small Deck has a dedicated icon keycap set, so launcher-style actions can use printable graphic caps instead of only text labels.我们专门为 Small Deck 做了图形键帽适配,启动器类操作可以直接使用可打印的图形键帽,而不只依赖文字标签。
Web Tools — Free Layout Configurator 网页工具 — 自由配列配置器
The Free Layout Configurator is an advanced extension of the Layout Generator: instead of a strict row × column matrix, key modules can be placed anywhere inside the plate boundary with free position, rotation and count. It remains a focused second-stage tool so the main Layout Generator stays straightforward, and is now available from Advanced Tools in the top navigation. 自由配列配置器是配列生成器的进阶扩展:按键模块不再受行×列矩阵约束,可在固定板边界内自由设置位置、角度和数量。它继续作为专注的二阶段工具独立运行,以保持主配列生成器简洁,并已整合到顶部导航的进阶工具菜单中。
Open Free Layout Configurator ↗打开自由配列配置器 ↗
- Intended use: special personalized builds that a regular matrix cannot express — for example hitbox-style layouts for GP2040-CE firmware.适用场景:常规矩阵难以表达的特殊个性化定制需求,例如 GP2040-CE 固件的 hitbox 布局。
- Output scope: this tool only generates the key-matrix mounting plate (keyboard shell). All other parts — outer shell, bottom plate, keycaps — are generated in the Layout Generator as usual, using the same rows × cols canvas size.输出范围:本工具仅生成按键矩阵模块(键盘固定板)。其余配件——外壳、底板、键帽等——照常在配列生成器中生成,画板尺寸沿用相同的行×列规格。
- Placement rules: the boundary margin and minimum module spacing follow the same limits as the matrix layout, so any valid free layout stays printable and assemblable.放置规则:边界距离与模块最小间距沿用矩阵配列的同一套限制,任何合法的自由布局都保持可打印、可装配。
Small Deck
Small Deck — Overview Small Deck — 概述
Small Deck is a combined software-and-hardware system that brings Stream Deck-style functionality to your desk: a launcher you trigger from dedicated keys to open a program, file, folder or website. It has two independent parts — a desktop app (software) and XPAD's F13–F24 output (hardware) — each covered in its own section below. Small Deck 是一套软硬件结合的系统,把类似 Stream Deck 的功能带到你的桌面:用专门的按键作为启动器,一键打开程序、文件、文件夹或网址。它由两个相互独立的部分组成——电脑端 App(软件)与 XPAD 的 F13–F24 输出(硬件),下文各有专门章节说明。
- Software软件部分 — the free Small Deck desktop app is a background launcher; bind each trigger to a program / file / folder / URL. Download Small Deck →免费的 Small Deck 电脑端软件是一个后台启动器,可为每个触发键绑定程序 / 文件 / 文件夹 / 网址。下载 Small Deck →
- Hardware硬件部分 — XPAD provides a layout that outputs F13–F24 — clean, rarely-used triggers that don't collide with everyday shortcuts.XPAD 提供一套输出 F13–F24 的布局,这些是干净、少冲突的触发键,不会占用常见快捷键。
Small Deck — Software Small Deck — 软件
The software side is a background launcher for the host computer. It does not require XPAD specifically: it listens for clean, rarely-used keyboard triggers such as F13–F24, then runs the action you assigned to that trigger. 软件部分是运行在电脑后台的启动器。它并不要求必须使用 XPAD:软件监听 F13–F24 这类干净、少冲突的键盘触发信号,然后执行你为该按键绑定的动作。
- A trigger can open a program, file, folder, or URL.一个触发键可以打开程序、文件、文件夹或网址。
- The app runs in the menu bar / system tray and can start on login.软件常驻菜单栏 / 系统托盘,并可设置为开机自启。
- Because it is based on standard keyboard events, any other device that can emit the same F13–F24 keycodes can trigger it too.因为它基于标准键盘事件,其他能发送 F13–F24 的设备也可以触发它。
There are two ways to run the actions on your computer: 在电脑上执行这些动作有两种方式:
- XPAD Small Deck — our optional, free companion app. Plug in the XPAD, click Read XPAD, and bind a program / file / folder / URL to each mapped key. It runs in the system tray and can start on login. Download Small Deck →我们提供的可选免费配套软件。插上 XPAD,点击读取 XPAD,为每个已映射的键绑定程序 / 文件 / 文件夹 / 网址。常驻系统托盘,可开机自启。下载 Small Deck →
- Third-party tools第三方工具 — since the key is a standard F-key, you can also use AutoHotkey / PowerToys (Windows) or Keyboard Maestro / Shortcuts (macOS) and bind the F-key to launch an app.因为是标准 F 键,你也可以用 AutoHotkey / PowerToys(Windows)或 Keyboard Maestro / 快捷指令(macOS),把 F 键绑定为「启动程序」。
Small Deck — Hardware (XPAD F13–F24) Small Deck — 硬件(XPAD F13–F24)
The hardware side is XPAD's dedicated Small Deck mapping area in the Layout Generator. It lets you assign F13–F24 to physical XPAD keys, creating a clean launcher layout without using common shortcuts that might conflict with apps. 硬件部分是 配列生成器中 XPAD 专门为 Small Deck 准备的按键映射区。它可以把 F13–F24 分配到 XPAD 的物理按键上,从而得到一套干净的启动器布局,避免占用常见快捷键。
This layout is designed to work well with the official Small Deck app, but it is not locked to it. Since the output is just standard F-key events, third-party launcher / automation tools can use the same XPAD layout. XPAD can emit these triggers through: 这套布局是为了很好地配合官方 Small Deck 软件,但并不绑定官方软件。由于输出只是标准 F 键事件,第三方启动器或自动化工具同样可以使用这套 XPAD 布局。XPAD 可通过以下固件输出这些触发键:
- XTIA official firmwareXTIA 官方固件 — assign F13–F24 directly in the Layout Generator and write them to the device.在配列生成器里直接分配 F13–F24 并写入设备。
- XPAD Neo (Arduino DIY) firmwareXPAD Neo(Arduino DIY)固件 — the open-source firmware can emit the same F13–F24 keycodes, so Small Deck works there too.开源固件同样可以发送 F13–F24 键码,因此 Small Deck 也可用。
Small Deck — Keycaps, Open Source & Security Small Deck — 键帽与开源安全
Small Deck layouts often benefit from clear visual labels: folder, terminal, browser, search, copy / paste and other launcher-style icons. You can create those icon keycaps directly in the Keycap Generator — choose Shape / Symbol when editing a key, then select the Small Deck icon group. The generated STL can be 3D printed as a dedicated icon keycap for your preset. Small Deck 布局通常需要更直观的图标标识,例如文件夹、终端、浏览器、搜索、复制 / 粘贴等启动器类图标。你可以直接在 键帽生成器 中生成:编辑按键时选择图形 / 符号,再从 Small Deck 图标分组中选择所需图标。生成的 STL 可以直接用于 3D 打印,制作预设专用的图标键帽。
Firmware固件
XTIA Official Firmware — Features & Overview XTIA 官方固件 — 功能概览
The XTIA firmware is the default and recommended option for most users. It provides tight integration with the web tools on this site, including real-time layout sync, in-browser ADC calibration, and persistent flash storage. XTIA 官方固件是大多数用户的默认推荐选项,与本站网页工具深度集成,支持实时配列同步、浏览器内 ADC 校准,以及 Flash 持久化存储。
| Feature功能 | Status支持情况 |
|---|---|
| USB HID Keyboard | ✓ |
| Magnetic switch ADC (Rapid Trigger)磁轴 ADC(Rapid Trigger) | ✓ |
| In-browser calibration浏览器内校准 | ✓ |
| Layout sync (read / write)配列同步(读 / 写) | ✓ |
| Media keys & macros媒体键与宏 | ✓ |
| Small Deck F13–F24 mappingSmall Deck F13–F24 映射 | ✓ via Layout Generator通过配列生成器 |
| Rotary encoder (rotate + push)旋钮编码器(旋转 + 按压) | ✓ |
| Microphone (USB audio input)麦克风(USB 音频输入) | ✓ |
| C1/C2 extension (MX switches in vib sockets)C1/C2 拓展(震动接口作机械轴) | ✓ via Advanced Settings — see C1/C2 extension通过进阶设置开启,见 C1/C2 拓展 |
| Vibration module (rumble)震动模块 | In development开发中 |
XTIA Firmware — How to Flash XTIA 固件 — 如何刷写
Download the XTIA firmware .uf2 from the Dev Docs page, then follow the standard UF2 Flash Method. No additional configuration is needed after flashing — the firmware boots with a default layout.
从 Dev Docs 页面下载 XTIA 固件 .uf2,按照标准 UF2 刷写方法 操作即可。刷写后无需额外配置,固件将以默认配列启动。
XTIA Firmware — ADC Calibration XTIA 固件 — ADC 校准
Hall-effect magnetic switches work out of the box, but one calibration pass after assembly is recommended for more accurate triggering. Each XPAD unit has slightly different ADC ranges due to magnet and PCB positioning tolerances. 磁轴开箱即可使用,但建议组装后进行一次校准,以获得更准确的触发结果。由于磁铁和 PCB 定位公差,每台 XPAD 的 ADC 范围略有差异。
Open the Hall-Effect Calibration page for the full interactive calibration tool. Calibration data is written to the RP2040's Flash and persists across power cycles. 打开 磁轴校准 页面使用完整的交互式校准工具。校准数据写入 RP2040 的 Flash,断电后不丢失。
XTIA Firmware — Layout Sync XTIA 固件 — 配列同步
The Layout Generator can read and write key assignments directly to/from the connected XPAD via WebUSB. Connect your XPAD over USB-C, open the Layout Generator, and click Read current set from XPAD or Write Layout. 配列生成器可通过 WebUSB 从已连接的 XPAD 读取或写入按键分配。通过 USB-C 连接 XPAD,打开 配列生成器,点击读取当前 XPAD 配列或写入配列。
GP2040-CE — Overview简介
GP2040-CE is an open-source, community-maintained gamepad firmware for the RP2040. It is primarily aimed at fight sticks and arcade controllers, offering broad compatibility with PlayStation, Xbox, Switch, and PC platforms via multiple USB modes (XInput, DirectInput, Nintendo Switch, PS4, PS5). GP2040-CE 是面向 RP2040 的开源社区维护游戏手柄固件,主要用于格斗摇杆和街机控制器,通过多种 USB 模式(XInput、DirectInput、Nintendo Switch、PS4、PS5)广泛兼容 PlayStation、Xbox、Switch 和 PC 平台。
Because XPAD uses the same Waveshare RP2040 Zero MCU, GP2040-CE can be flashed directly without any hardware modification. The vibration module is fully compatible with GP2040-CE's native rumble output. 由于 XPAD 使用与 GP2040-CE 相同的 Waveshare RP2040 Zero 主控,可以直接刷写,无需任何硬件改动。震动模块与 GP2040-CE 的原生震动输出完全兼容。
The XTIA-provided GP2040-CE preset uses a special build based on the official GP2040-CE firmware, with an added full-linear Hall-effect input add-on for XPAD's magnetic switches. This build is mainly optimized for racing games, where the Hall switches can behave like smooth analog inputs rather than simple on/off buttons. XTIA 预设提供的 GP2040-CE 固件使用了一个特殊构建:它基于官方 GP2040-CE 固件,并额外加入了面向 XPAD 磁轴的霍尔轴全线性输入插件。这个预设主要针对赛车类游戏优化,让磁轴可以作为平滑的线性输入,而不仅是普通的开关按键。
If you want to define a regular GP2040-CE button layout, or use the magnetic switches as ordinary digital buttons, you can still adjust the mapping in the GP2040-CE Web Configurator after flashing. 如果你需要自行定义常规的 GP2040-CE 按键布局,或者希望将磁轴作为普通按键使用,也可以在刷写后进入 GP2040-CE Web Configurator 中修改映射。
GP2040-CE — How to Flash如何刷写
BOOT button (the standard UF2 method) — simply open the cover, hold BOOT, and plug in the USB cable.
由于 XPAD 的后盖结构易于开启,建议直接采用开发板上的 BOOT 按钮进行固件刷写(即标准 UF2 方式)——打开后盖,按住 BOOT,再插入 USB 数据线即可。
-
1Download the GP2040-CE .uf2下载 GP2040-CE .uf2 文件 Download the GP2040-CE
.uf2from the Dev Docs page. Use the XTIA-provided build — it ships with the XPAD pin mapping pre-configured.从 Dev Docs 页面下载 GP2040-CE.uf2。请使用 XTIA 提供的构建版本——已预置 XPAD 针脚映射配置。 -
2Enter BOOTSEL mode and flash进入 BOOTSEL 模式并刷写 Follow the standard UF2 Flash Method. Drag the
.uf2onto theRPI-RP2drive.按照标准 UF2 刷写方法 操作,将.uf2文件拖入RPI-RP2磁盘。 -
3Reconnect and open the Web Configurator重新连接并打开 Web 配置器 Reconnect the USB cable normally. Open a browser and navigate to
http://192.168.7.1to access the GP2040-CE web configurator.正常重新插入数据线。打开浏览器访问http://192.168.7.1进入 GP2040-CE Web 配置器。 -
4Verify pin mapping确认针脚映射 In the Web Configurator, go to Configuration → Pin Mapping and confirm the GPIO assignments match the XPAD wiring table below.在 Web 配置器中进入 Configuration → Pin Mapping,确认 GPIO 分配与下方 XPAD 插线表一致。
GP2040-CE — XPAD Pin MappingXPAD 针脚映射
The table below defines how XPAD GPIO pins map to GP2040-CE button functions. If you are using the XTIA-provided GP2040-CE build, these are already pre-configured. Only manual configuration is needed if you are building a custom GP2040-CE image. 下表定义了 XPAD GPIO 引脚与 GP2040-CE 按键功能的对应关系。如果使用 XTIA 提供的 GP2040-CE 构建版本,这些已经预先配置好,只有在自行构建自定义 GP2040-CE 镜像时才需要手动配置。
| GPIO | XPAD Mainboard SocketXPAD 主控插口 | GP2040-CE Function功能 | PS / Xbox Equiv.PS / Xbox 对应 | Notes备注 |
|---|---|---|---|---|
| GP0 | b1 | B1 | Cross / A | |
| GP1 | b2 | B2 | Circle / B | |
| GP2 | b3 | B3 | Square / X | |
| GP3 | b4 | B4 | Triangle / Y | |
| GP4 | b5 | L1 | L1 / LB | |
| GP5 | b6 | R1 | R1 / RB | |
| GP6 | b7 | S1 | Back / Select / Share | |
| GP7 | b8 | S2 | Start / Options | Also used to enter WebConfig (hold at power-on)同时用于进入 WebConfig(上电时按住) |
| GP8 | c1 | DRV8833 Rumble — Left motor PWMDRV8833 震动 — 左马达 PWM | VIB Addon震动 Addon | |
| GP9 | c2 | DRV8833 Rumble — Right motor PWMDRV8833 震动 — 右马达 PWM | VIB Addon震动 Addon | |
| GP20 | E1 | A1 | PS / Home / Guide | EC06 encoder push (e1 SW)EC06 编码器按压 e1 SW |
| GP21 | E1 | RotaryEncoder Addon — PIN_A (volume / scroll)RotaryEncoder Addon — PIN_A(音量 / 滚动) | ENC Addon | |
| GP22 | E1 | RotaryEncoder Addon — PIN_B (volume / scroll)RotaryEncoder Addon — PIN_B(音量 / 滚动) | ENC Addon | |
| GP26 | a1 | MultiChannelADC → LX(−) (steer left)(转向左) | ADC — a1 | |
| GP27 | a2 | MultiChannelADC → LX(+) (steer right)(转向右) | ADC — a2 | |
| GP28 | a3 | MultiChannelADC → RT (throttle)(油门) | ADC — a3 | |
| GP29 | a4 | MultiChannelADC → LT (brake)(刹车) | ADC — a4 | |
| GP17–19 | D1 | I2S microphone (SCK / WS / SD)I2S 麦克风(SCK / WS / SD) | Not used未使用 | |
GP2040-CE — Web ConfiguratorWeb 配置器
GP2040-CE hosts its own web configurator over USB Ethernet, served at http://192.168.7.1. The board must be in Web Configurator mode to serve this UI — XPAD has two ways to enter it:
GP2040-CE 通过 USB 以太网托管自己的 Web 配置器,地址为 http://192.168.7.1。主板必须处于 Web 配置器模式 才会提供该界面——XPAD 有两种进入方式:
| Method方式 | Operation操作 |
|---|---|
| Power-on entry上电进入 | Hold b8 (S2 / Start, GP7) while plugging in USB插入 USB 时按住 b8(S2 / Start,GP7) |
| Hot-key (running)热键(运行中) | Hold b8 + b3 + b4 (S2 + B3 + B4) for 4 seconds同时按住 b8 + b3 + b4(S2 + B3 + B4)持续 4 秒 |
Once in Web Configurator mode, open http://192.168.7.1 in any browser. Key configuration areas:
进入 Web 配置器模式后,在任意浏览器中打开 http://192.168.7.1。主要配置区域:
| Section页面 | What you configure here配置内容 |
|---|---|
| Configuration → Pin Mapping | Map GPIO pins to button functions (use XPAD table above)将 GPIO 引脚映射到按键功能(参考上方 XPAD 表格) |
| Configuration → LED | RGB / LED settings (if LED module fitted)RGB / LED 设置(如已安装 LED 模块) |
| Configuration → Add-Ons | Enable vibration (Rumble) add-on and set motor pins启用震动(Rumble)附加功能并设置电机引脚 |
| Settings → Input Mode | Switch between XInput, Nintendo Switch, PS4, DirectInput, etc.在 XInput、Nintendo Switch、PS4、DirectInput 等模式间切换 |
GP2040-CE — Vibration Module震动模块
XPAD already includes DRV8833 vibration-motor support and the motor pins are broken out, compatible with GP2040-CE's native Rumble add-on. Enable it under Configuration → Add-Ons → Rumble, then enter the GPIO pin numbers for the left and right motor outputs as specified in the XPAD pin mapping table. XPAD 已完成 DRV8833 震动马达的适配,且电机针脚已引出,与 GP2040-CE 的原生 Rumble 附加功能兼容。在 Configuration → Add-Ons → Rumble 中启用,然后按 XPAD 针脚映射表填写左右电机的 GPIO 引脚编号。
GP2040-CE — Pros & Cons on XPAD在 XPAD 上的优势与劣势
Cons劣势
- You have to re-learn GP2040-CE — it's effectively a separate system — and XPAD's own Layout Generator no longer applies.需要重新学习 GP2040-CE 的使用(相当于是另外一套系统),XPAD 本身的配列工具不再支持。
Pros优势
- For gamepad use, GP2040-CE is a larger and more professional firmware, offering multi-platform gamepad driver support and lower latency.对于游戏手柄功能来说,GP2040-CE 是更庞大且更专业的固件,提供多平台游戏手柄驱动支持和更低的延迟。
- Thanks to the RP2040's quick USB (UF2) flashing mode, you can switch and compare between different firmwares very quickly.借助 RP2040 快捷的 USB 固件刷写模式,你可以非常快速地在不同固件之间切换比对。
Feature availability功能可用性
| Feature功能 | Available under GP2040-CE?GP2040-CE 下是否可用 |
|---|---|
| ADC / Hall-effect calibrationADC / 磁轴校准 | No — GP2040-CE does not support analog key calibration不可用——GP2040-CE 不支持模拟轴校准 |
| Rapid Trigger | No不可用 |
| Layout sync (XTIA web tool)配列同步(XTIA 网页工具) | No — use GP2040-CE Web Configurator instead不可用——改用 GP2040-CE Web 配置器 |
| USB HID KeyboardUSB HID 键盘 | No — GP2040-CE outputs as gamepad only不可用——GP2040-CE 仅以游戏手柄方式输出 |
| Vibration module震动模块 | Firmware & pins ready (via Rumble add-on) — module not yet offered固件与针脚已就绪(通过 Rumble 附加功能)——模块暂未提供 |
| Multi-platform gamepad (XInput / PS4 / Switch)多平台游戏手柄 | Yes — this is GP2040-CE's primary strength可用——这是 GP2040-CE 的核心优势 |
XPAD Neo (Arduino DIY Firmware) — Overview XPAD Neo(Arduino DIY 固件)— 简介
XPAD Neo on GitHubXPAD Neo GitHub 仓库XPAD Neo is XPAD's open-source Arduino-based DIY firmware, intended for firmware study and modification. Important code sections include comments explaining the related concepts. XPAD Neo 是 XPAD 基于 Arduino 的开源 DIY 固件,面向固件学习和修改。关键代码段包含对应概念说明。
XPAD Neo — Environment Setup XPAD Neo — 环境配置
-
1Install Arduino IDE 2.x安装 Arduino IDE 2.x Download from
arduino.cc/en/software. Arduino IDE 2.x is recommended over 1.x for its better auto-complete and serial monitor.从arduino.cc/en/software下载。推荐使用 Arduino IDE 2.x,其自动补全和串口监视器优于 1.x 版本。 -
2Add the RP2040 board package添加 RP2040 开发板支持包 In Arduino IDE, go to File → Preferences and add the following URL to Additional Board Manager URLs:
https://github.com/earlephilhower/arduino-pico/releases/download/global/package_rp2040_index.json
Then open Tools → Board → Board Manager and install Raspberry Pi Pico / RP2040. 在 Arduino IDE 中进入 文件 → 首选项,在"附加开发板管理器网址"中添加以下链接:
https://github.com/earlephilhower/arduino-pico/releases/download/global/package_rp2040_index.json
然后打开 工具 → 开发板 → 开发板管理器,安装 Raspberry Pi Pico / RP2040。 -
3Select the correct board选择正确的开发板 Go to Tools → Board → Raspberry Pi RP2040 and select Waveshare RP2040 Zero. Set the USB stack to Adafruit TinyUSB for HID support.进入 工具 → 开发板 → Raspberry Pi RP2040,选择 Waveshare RP2040 Zero。将 USB 协议栈设置为 Adafruit TinyUSB 以支持 HID 功能。
-
4Open and compile the XPAD DIY firmware打开并编译 XPAD DIY 固件 Download the firmware ZIP from the Dev Docs page, extract, and open the
.inofile. Click Verify (✓) to compile — no errors should appear on a clean install.从 Dev Docs 页面下载固件 ZIP 并解压,打开.ino文件。点击 验证(✓)编译——干净安装后应无任何错误。 -
5Flash via Arduino IDE通过 Arduino IDE 烧录 Enter BOOTSEL mode with the
BOOTbutton (see the UF2 Flash Method), then click Upload (→) in Arduino IDE. The IDE will detect the drive and flash automatically.用BOOT按钮进入 BOOTSEL 模式(见 UF2 刷写方法),然后在 Arduino IDE 中点击 上传(→),IDE 会自动检测磁盘并烧录。
XPAD Neo — Code Review Workflow XPAD Neo — 代码阅读流程
The DIY firmware is written with inline comments and can be reviewed with a code assistant. Recommended workflow: DIY 固件包含源码注释,可配合代码助手阅读。推荐流程如下:
-
1Open a code assistant打开代码助手 Use a tool that can read longer source files and answer implementation questions.使用可阅读较长源码并回答实现问题的工具。
-
2Paste the source code粘贴源代码 Paste the
.inofile and ask for a section-by-section explanation.粘贴.ino文件,并要求按段解释代码。 -
3Ask targeted questions提出有针对性的问题 For example: "What does the debounce section do?", "How would I add a second USB HID report?", "Can you help me remap GP5 to a macro key?"例如:"去抖动部分是做什么的?"、"怎么添加第二个 USB HID 报告?"、"能帮我把 GP5 改成宏按键吗?"
-
4Apply changes and flash应用修改并烧录 Edit the code, compile in Arduino IDE, and flash. Repeat after verifying the behavior on hardware.修改代码,在 Arduino IDE 中编译并烧录。通过硬件验证后再继续迭代。
SCAD AutomationSCAD 自动化生成
OpenSCAD-based shell generation 基于 OpenSCAD 的外壳生成
XPAD's shell is designed in the OpenSCAD format, with a tolerance system built specifically for 3D printing. This avoids the assembly difficulties that arise when different materials shrink or expand differently, so printed parts fit together reliably. XPAD 的外壳使用 OpenSCAD 格式进行设计,并针对 3D 打印设计了公差系统,避免因为材料不同而导致打印成品装配困难,让各个分件都能可靠地拼合。
VibeCADing — a SCAD development helper VibeCADing —— SCAD 开发辅助工具
While designing XPAD we ran into several pain points in the traditional SCAD workflow, so we also built a helper tool for SCAD development: VibeCADing. 我们在设计过程中发现了传统 SCAD 在使用过程中的一些难点,因此也开发了一个用于 SCAD 开发的辅助工具:VibeCADing。
For automated geometry generation, VibeCADing can be used as an auxiliary OpenSCAD viewer and editing workflow. The tool is free and open source. 对于自动化几何生成,VibeCADing 可作为 OpenSCAD 查看与编辑流程的辅助工具。该工具免费且开源。
Development Progress & Designer Q&A开发进度与设计解答
Project Status 项目状态
XPAD is in the preview stage. The core hardware, firmware, web tools, and server-side generation flow are already functional, while several launch and production tasks are still being prepared. XPAD 目前处于预览阶段。核心硬件、固件、网页工具与服务器端生成流程已基本可用,正式发布和量产相关事项仍在准备中。
Development Progress & Roadmap 开发进度与 Roadmap
Completed已完成
- The core XPAD keyboard functions are working, including configurable key behavior and persistent device settings.XPAD 的核心键盘功能已可用,包括可配置按键行为和设备端配置保存。
- The main module types have been integrated into the product concept, including mechanical keys, hall-effect keys, microphone input, and rotary control.主要模块类型已整合进产品方案,包括机械轴、磁轴、麦克风输入和旋钮控制。
- The browser tools can configure layouts, preview models, and generate printable files for common XPAD builds.网页工具已可完成配列配置、模型预览,并为常见 XPAD 组合生成可打印文件。
- The keycap workflow is available, including text keycaps, shape variants, oversized caps, and Small Deck icon caps.键帽工作流已可用,包括文字键帽、形状变化、超尺寸键帽和 Small Deck 图形键帽。
- Small Deck has a working desktop launcher flow and a matching XPAD control preset.Small Deck 已具备可用的电脑端启动器流程,并配有对应的 XPAD 控制预设。
- The public website, documentation, downloads, and basic access-control flow are in place for preview use.公开网站、文档、下载入口和基础授权流程已就绪,可用于预览阶段。
Roadmap before launch正式发布前计划
- Complete the remaining formal identifiers, release packaging, and production checks before public launch.完成正式发布前所需的标识申请、发布打包和量产检查。
- Finalize download authorization, purchase flow wording, and user-facing access instructions.完成下载授权、购买流程说明和面向用户的访问说明。
- Run a final full-process validation from device setup to file download and daily use.进行最终全流程验证,覆盖设备设置、文件下载和日常使用路径。
- Continue polishing performance, documentation, and companion-tool distribution for the launch version.继续优化性能、文档和配套工具分发,整理为正式发布版本。
Crowdfunding 众筹
XPAD's official hardware kits are now live on two crowdfunding platforms. Choose the campaign that is most convenient for you to view the available packages and support the project. XPAD 官方硬件套装现已在两个众筹平台上线。请选择方便的平台查看可选套装并支持项目。
Developer Design Q&A 开发者设计解答
Why build XPAD?为什么做这个项目?
XPAD is XTIA's first deeply cross-disciplinary design project. It connects our experience in industrial design, product design, graphic design, electronics, embedded systems, and software into one 3D-print-oriented product. The goal is to explore a path between simply downloading a fixed model and modeling everything by hand: using a SCAD generator to create printable models that users can still control. XPAD 是 XTIA 第一个高度跨领域的设计项目。它把我们在工业设计、产品设计、平面设计、电子电路、嵌入式和软件开发中的经验串联到一个面向 3D 打印的产品里。我们想探索一条介于“下载固定模型”和“完全自己建模”之间的路线:用 SCAD 生成器生成用户仍可控制的可打印模型。
What is open, and what remains closed?开源与封闭如何划分?
XPAD uses many mature ideas from the maker and keyboard communities, so the parts that are suitable for sharing will be opened as much as possible. This includes the Arduino learning firmware, the Small Deck companion system, and selected web tools. The main XTIA firmware and the complete SCAD generation system remain closed for now, because the multi-file SCAD pipeline is the core work that makes XPAD possible. XPAD 在开发中借鉴了很多成熟经验,因此适合公开的部分会尽量开放,包括 Arduino 入门固件、Small Deck 配套系统,以及部分独立网页工具。XTIA 主固件和完整 SCAD 生成系统暂时不会开源,因为这套多文件 SCAD 管线是 XPAD 能成立的核心工作。
The firmware downloads and the xtiaconfiger.com web tools will still be available for users. With a compatible RP2040 board and your own wiring, you can build a non-official XPAD-style setup without buying the full hardware kit. 固件下载和 xtiaconfiger.com 网页工具仍会面向用户开放。只要使用兼容的 RP2040 开发板并自行接线,你也可以在不购买完整硬件套件的情况下搭建非官方 XPAD 方案。
Why only four hall-effect keys?为什么只有 4 个磁轴?
For most normal keyboard use, hall-effect switches do not show their full advantage. They matter most when analog travel or very fast repeated input is useful. RP2040 also has four native ADC channels; expanding beyond that would add a lot of complexity. Four independent channels already cover the main XPAD targets: rhythm-game keys and fully linear racing-style input, so we chose to keep this part simple and reliable. 在大多数常规键盘场景中,磁轴的优势并不会完全体现。它真正有价值的地方,是需要模拟行程或高速重复触发的场景。RP2040 原生也只有 4 个 ADC 通道,继续扩展会显著增加复杂度。4 路独立输入已经能覆盖 XPAD 的主要目标:音游键盘和全线性赛车类输入,因此我们选择保持简单、可靠。
Why use RP2040 as the core?为什么选择 RP2040 作为核心?
RP2040, known through the Raspberry Pi Pico ecosystem, is approachable, widely available, and very easy to flash: for most users it feels like copying a file to a USB drive. That makes it suitable for a project designed around multiple firmware options and user experimentation. RP2040 is also well supported by GP2040-CE, whose mature multi-protocol game-controller firmware complements XPAD; at the same time, XPAD adds a modular DIY hardware direction to that ecosystem. RP2040(树莓派 Pico 生态)入门难度低、购买方便,固件刷写也非常简单:对大多数用户来说接近“把文件复制到 U 盘”这样的操作。这很适合 XPAD 这种需要多固件适配、并鼓励用户实验的项目。同时,RP2040 原生支持 GP2040-CE;这个成熟的多协议游戏控制器固件能补充 XPAD,而 XPAD 也为 GP2040-CE 的 DIY 生态提供了模块化硬件方向。
Why is XPAD wired?为什么做有线?
A wired design keeps XPAD simpler, more open, and easier to reproduce. Wireless would add firmware complexity on RP2040, extra certification work, battery shipping constraints, and higher cost for users. It would also make the assembly system harder to control. XPAD already needs to handle variable sizes, on-demand model generation, screwless assembly, and 3D-printing tolerances; adding wireless modules and batteries would push the project beyond its intended scope. 有线方案让 XPAD 更简单、更开放,也更容易被用户复现。无线会让 RP2040 固件复杂度上升,还会带来无线认证、电池运输限制和更高的用户成本。它也会让装配系统更难控制。XPAD 已经需要处理可变尺寸、即时模型生成、无螺丝安装和 3D 打印公差;如果再加入无线模块和电池,项目会超出我们希望控制的范围。
How will XPAD be sold?销售形式是什么?
Most XPAD software features will remain available free of charge. Our crowdfunding campaign and future sales will focus on complete hardware kits designed to provide the full XPAD experience. XPAD 软件的绝大部分功能都将免费提供。我们的众筹和后续销售将主要提供完整的硬件套装,用于获得完整的 XPAD 使用体验。
Users can continue exploring the web tools, firmware, and companion software independently. The hardware kits bring together the modular controller, plug-in key modules, and related parts in a tested, ready-to-assemble package. 用户仍可独立使用网页工具、固件和配套软件。硬件套装则会将模块化主控、插接式按键模块及相关配件整合为经过验证、可直接组装的完整方案。